- Log in to the Replay app. This will take you to the homepage of your club.
- Once you're on your club's homepage, select a game you'd like to highlight.

- If you are now in the game from which you want to create highlights, go to the playlists that you created previously. Select the playlist you created. If you don't know how to create playlists, read this guide.
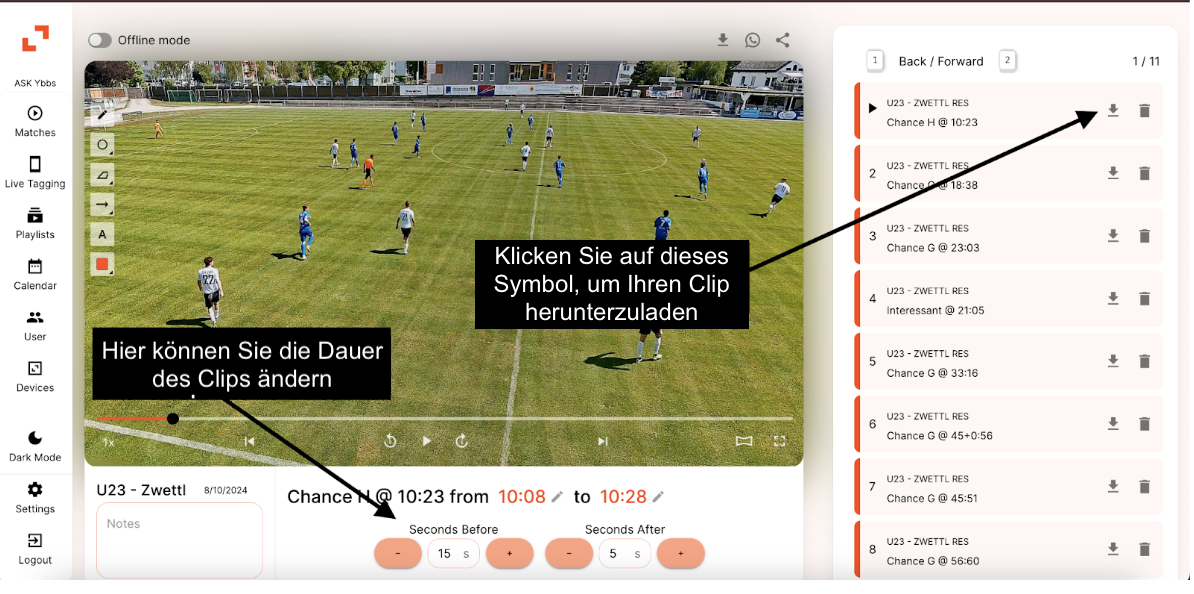
- Once you are in your playlist, you will need to download the clips individually to your device. Please note that downloading the individual clips is faster than downloading them as a playlist.
- If you're unable to download a clip, it usually means the duration hasn't been set correctly. The values for "Seconds Before" and "Seconds After" need to be different; they can't be the same. To resolve this, adjust the clip's duration, then try downloading it again.
Once you have downloaded all the clips, you can organise them in a folder to make your work easier. If not, you can proceed to the next step.
- Now comes the fun part - creating the actual highlights. Choose the editing software of your choice. Popular free options include iMovie, which is available to all Apple users, and Capcut, which is free to download. If you want to take your editing to a higher level, you can opt for paid software such as Premiere Pro, which has more advanced features. The process for creating highlights is the same for each editing software.
- Wir werden iMovie verwenden, weil es den meisten Menschen zur Verfügung steht und kostenlos ist. Öffnen Sie die Anwendung und klicken Sie unter der Registerkarte „Projekte“ auf „Neu erstellen“. Klicken Sie dann auf „Film“.
- This will take you to the iMovie editing page where you can start editing. The first step is to transfer all your clips to the application. There are two ways to do this: You can either drag the clips to where it says ‘Import Media’, click ‘Import Media’ and select the clips, or select the folder you created a few steps ago.
- After you have imported your clips, your workspace will look like this.
- When your clips are ready, you can simply drag them into the timeline at the bottom, where you can start editing the video. Your timeline should look like this.
- From there, you can customise each clip by extending or trimming it to the desired length, like this.
trimming screen recording - You can even zoom into a clip like this.
Screen Recording 2024-10-22 at 2.17.57 PM - Once you have compiled your clips to your liking, you can export your highlight reel. This process can take a few minutes depending on the length, so wait and see!
Screen Recording 2024-10-07 at 7.50.42 AM - Once the video has been successfully exported, this message will pop up on the top right corner
- Now it's time to enjoy the highlight reel you've created! Don't forget to share it with your family and friends too!


 Once you have downloaded all the clips, you can organise them in a folder to make your work easier. If not, you can proceed to the next step.


